Virtual Labs

Citrix Virtual Lab

Remote access to applications is provided by our UNT online virtual lab powered by Citrix. Find this lab here: https://myuntlab.unt.edu/

Provide Virtual Lab feedback here!

VMware Virtual Lab Special Class Access

Remote access to G. Brint Ryan College of Business applications is provided by our VMware Horizon View virtual desktop system. You can connect to different "pools" of virtual machines, based on your entitlements, from any internet connected computer. Specialized Classes at present are BCIS 3680, BCIS 4630, BCIS 4660, BCIS 4680, BCIS 4740, and BCIS 5740.

Provide Virtual Lab feedback here!

VPN

You must connect to the UNT VPN before connecting to VMware.

  1. Navigate to vpn.unt.edu
  2. Log in with your EUID and password.
  3. Select Anyconnect on the left menu bar and follow the instructions on the right to install the client.
  4. When you run Anyconnect enter vpn.unt.edu and click connect.

Installation Instructions

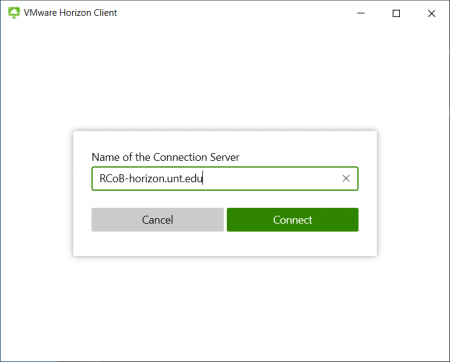
Navigate to RCoB-horizon.unt.edu to download and install the latest version of the VMware Horizon View client appropriate to your system.

Windows users:
  1. Login as an administrator before installing.
  2. Run the downloaded .exe file to start the installation.
  3. Follow the installation wizard to complete installation.
  4. When prompted to enter a connection server, enter RCoB-horizon.unt.edu.
  5. Run the client.
Mac OSX users
  1. Open the downloaded disk image.
  2. Follow the installation instructions, and when prompted, drag the VMware icon into your Applications folder.
  3. Eject the disk image from Finder.
  4. Run the client.

Note- Mac users may have to disable verification for server identity certificates.

Chrome OS
  1. Log in to your Chromebook.
  2. Download and install the Horizon Client for Chrome OS app from the Chrome Web Store. (https://chrome.google.com/webstore/detail/vmware-horizon-client-for/ppkfnjlimknmjoaemnpidmdlfchhehel?hl=en)
  3. To determine that the installation succeeded, verify that the Horizon Client for Chrome OS app icon appears in the Chrome App Launcher.
  4. Run the client
Linux

This guide is for Linux 2006 refer to https://docs.vmware.com/en/VMware-Horizon-Client-for-Linux/index.html for installation documentation for a different version of Linux.

  1. On the Linux client system, download the Horizon Client installer file from the Horizon Client Product Downloads page at http://www.vmware.com/go/viewclients.

The name of the file is VMware-Horizon-Client-YYMM-x.x.x-yyyyyyy.arch.bundle.

In the installer filename, YYMM represents the marketing version number, x.x.x represents the internal version number, and yyyyyyy represents the build number. arch represents the CPU instruction set architecture, either x86 or x64.

  1. Open a Terminal window, change directories to the directory that contains the installer file, and run the installer, using the appropriate command.

Option

Command

For the GUI wizard, if you have set executable permissions

sudo ./VMware-Horizon-Client-YYMM-x.x.x-yyyyyyy.arch.bundle

For the GUI wizard, if you have not set executable permissions

sudo sh ./VMware-Horizon-Client-YYMM-x.x.x-yyyyyyy.arch.bundle

For the command-line installer

sudo ./VMware-Horizon-Client-YYMM-x.x.x-yyyyyyy.arch.bundle --console

  1. The installer wizard appears, prompting you to accept the end-user license agreement.
  2. To finish the installation, follow the prompts.

Important:You are prompted to allow the installer to register and start installed services after the installation. Allowing the installer to complete these tasks means that you do not need to manually start USB redirection services every time you reboot.

  1. After installation is complete, specify whether to perform the compatibility scan for libraries that various feature components depend on.

The system scan displays a result value for each library compatibility.

Result Value

Description

Success

All required libraries were found.

Failed

The specified library was not found. You must locate and install the required library version on the client system. For more details, refer to the documentation and support information for your Linux distribution.

  1. Run the client

Setup Instructions

  1. To run the client simply double-click the VMware View Client desktop icon
  2. Set the Connection server to RCoB-horizon.unt.edu
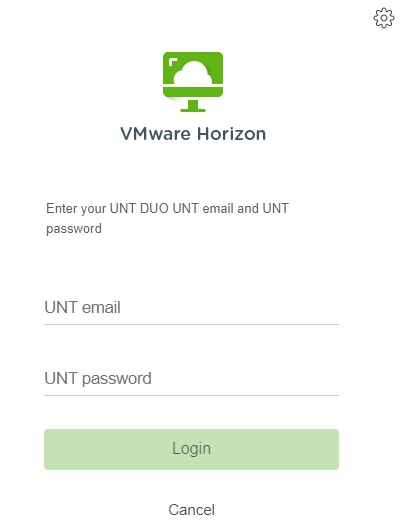
  3. Log in with your EUID and password, making sure you change the Domain to STUDENTS.
  4. You should then see a selection dialog similar to the following based on the class you are enrolled in.
  5. You can set the display settings by right-clicking on the pool. We suggest you change the display to Window if you plan to switch back to your home/local machine.
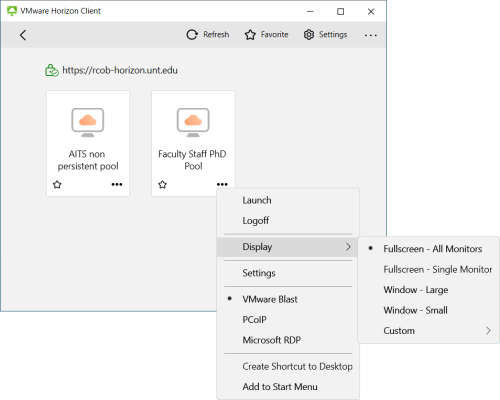
  6. Double-click the icon and the View Client will then open in a new window to the virtual machine.
  7. When finished with your session, simply close the View Client window and it will disconnect you from the desktop.

Disclaimer: Do not use VMware for time sensitive or last minute projects. The Lab Desktop machines are not persistent. This means anything you store on them will be gone the next time you use a machine. Please use other sources of storage for your files.

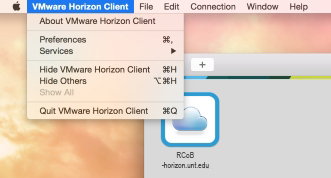
Disabling Certificate Verification- Mac only(top)

If while using a Mac you encounter an error regarding the server certificate and are unable to access VMWare, you will need to do the following

  • Navigate to the VMware Horizon Client menu in the upper left hand of the screen, and click on “preferences”.
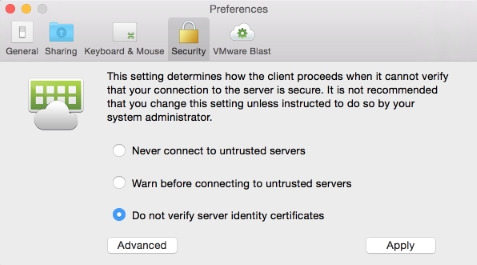
  • Navigate to the “Security” tab and select the check button that says “Do not verify server identity certificates”. Hit apply and then retry your connection.
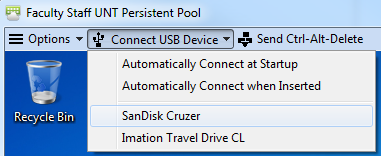
Connecting a USB storage device to VMware
  1. Make sure your USB device is plugged in.
  2. Click on Connect USB Device at the top of the VMware window.
  3. Select your USB device from the list.